

 We deliver to lockers!
Pick up your orders anytime, hassle-free!
 Fast Delivery!
Orders placed by 2:00 PM are shipped the same day. Delivered within 24h!
 2-Year Warranty
Reliable products, worry-free!
 Easy 14-Day Returns
Unused items? No questions asked!
 |
Original ProductAuthorized Arduino® Distributor |
Do you need a larger quantity?We offer genuine Arduino products both from our stock and directly from the manufacturer, in any desired quantity, at negotiable prices, with delivery in approximately 2 weeks or even sooner. Additionally, you can order any Arduino product from us, even if it is not listed on our website. Contact us for more details and to benefit from personalized offers! |
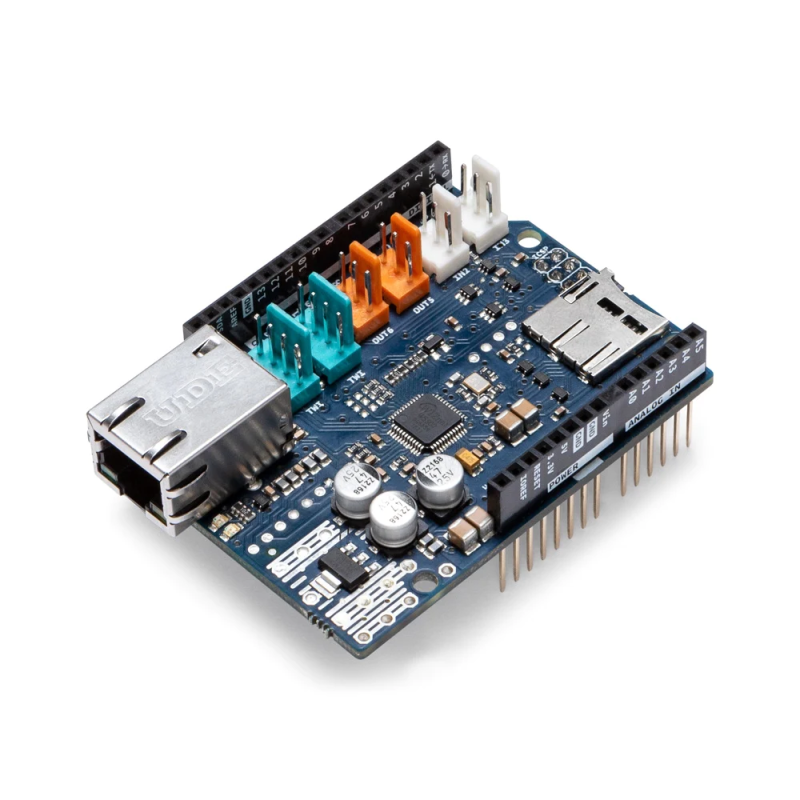
OverviewThe Arduino Ethernet Shield 2 connects your Arduino to the internet in mere minutes. Just plug this module onto your Arduino Board, connect it to your network with an RJ45 cable (not included) and follow a few simple steps to start controlling your world through the internet. As always with Arduino, every element of the platform – hardware, software and documentation – is freely available and open-source. This means you can learn exactly how it's made and use its design as the starting point for your own circuits. Hundreds of thousands of Arduino Boards are already fueling people’s creativity all over the world, everyday. Join us now, Arduino is you!
You can find your board warranty information here. Tech specs:The Arduino Ethernet Shield 2 allows an Arduino Board to connect to the internet. It is based on the (Wiznet W5500 Ethernet chip). The Wiznet W5500 provides a network (IP) stack capable of both TCP and UDP. It supports up to eight simultaneous socket connections. Use the Ethernet library to write sketches that connect to the Internet using the Shield. The Ethernet Shield 2 connects to an Arduino Board using long wire-wrap headers extending through the Shield. This keeps the pin layout intact and allows another Shield to be stacked on top of it.The most recent revision of the board exposes the 1.0 pinout on rev 3 of the Arduino UNO Board. The Ethernet Shield 2 has a standard RJ-45 connection, with an integrated line transformer and Power over Ethernet enabled. There is an onboard micro-SD card slot, which can be used to store files for serving over the network. It is compatible with the Arduino Uno and Mega (using the Ethernet library). The onboard micro-SD card reader is accessible through the SD Library. When working with this library, SS is on Pin 4. The original revision of the Shield contained a full-size SD card slot; this is not supported. The Shield also includes a reset controller, to ensure that the W5500 Ethernet module is properly reset on power-up. Previous revisions of the Shield were not compatible with the Mega and needed to be manually reset after power-up. The current Shield supports a Power over Ethernet (PoE) module designed to extract power from a conventional twisted pair Category 5 Ethernet cable.
NB: the Power over Ethernet module is proprietary hardware not made by Arduino, it is a third party accessory. For more information, see the datasheet The Shield does not come with a built in PoE module, it is a separate component that must be added on. Arduino communicates with both the W5500 and SD card using the SPI bus (through the ICSP header). This is on digital pins 10, 11, 12, and 13 on the Uno and pins 50, 51, and 52 on the Mega. On both boards, pin 10 is used to select the W5500 and pin 4 for the SD card. These pins cannot be used for general I/O. On the Mega, the hardware SS pin, 53, is not used to select either the W5500 or the SD card, but it must be kept as an output or the SPI interface won't work. Note that because the W5500 and SD card share the SPI bus, only one at a time can be active. If you are using both peripherals in your program, this should be taken care of by the corresponding libraries. If you're not using one of the peripherals in your program, however, you'll need to explicitly deselect it. To do this with the SD card, set pin 4 as an output and write a high to it. For the W5500, set digital pin 10 as a high output.
In this picture below we have tagged the yellow ACT, the green LINK,, the 13 Built in LED and the ON LED. This shield also hosts Tinkerkit compatible connectors as follows:
ConformitiesThe following Declarations of Conformities have ben granted for this board:
CE UKCA REACH
|
Your review appreciation cannot be sent
Report comment
Report sent
Your report cannot be sent
Write your review
Review sent
Your review cannot be sent
Reference: IOXEKD_XH-M632_CHARGE_MOD

check_circle
check_circle